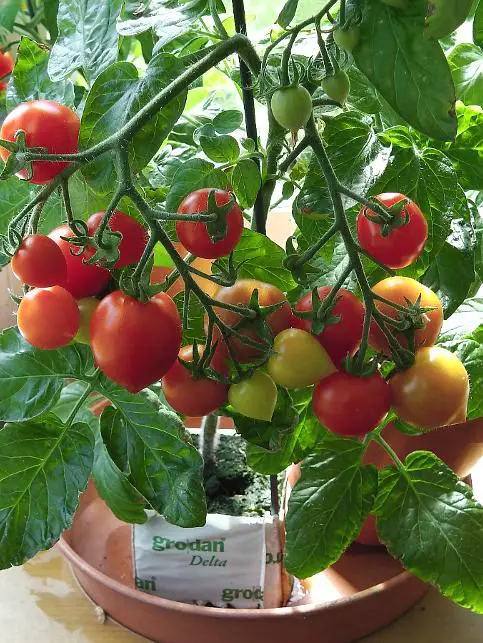
The Oasesbox is one of the most versatile Self Watering Planters (SWP) on the market and with a few tips and tricks, it is one of the best Self Watering Planters available.
I recommend that a grow bag is placed on three Oasesboxes to increase soil volume when growing salad and beefsteak tomatoes.

The design is clever yet simple, making it very easy to set up. The reservoir (per plant) is the largest when compared to most of its competitors. It is very easy to water and the results are first class! So here is how to use the Oasesbox to get the best results!
Introduction
Growing tomatoes successfully in self watering planters is all about watering and feeding the right amounts at the right time. Also, the ratio of moisture and oxygen (water and air) in the soil is also important – whether you have a wet/dry cycle or a consistent supply.
The Wet/Dry Cycle
A wet/dry cycle waters soil thoroughly, then allows air back between the soil particles as the water is used up by a plant and also evaporates. The wet/dry cycle is ideal for young tomato plants pre-flowering but as plants develop flowers and fruit they need access to water 24/7 to avoid Blossom End Rot and other water related problems.
The biggest challenges in Tomato Growing
Traditionally, the two biggest challenges when growing tomatoes have been Tomato Blight and Blossom End Rot. Avoiding blight is now easy, by choosing to grow blight free varieties. Avoiding BER is is one of the benefits when using a self watering planter!
Watering Tomatoes
It is true that tomatoes require plenty of water but only at the right time – when they are fruiting. Strong healthy roots are developed when soil holds plenty of oxygen and water is kept to a minimum.
A young tomato plant will need a lot less water than a mature plant that is fruiting. This means that water levels in the reservoir should be kept at a level that is suitable for the age of the plant, and also the weather conditions such as temperatures etc.
Feeding Tomatoes
Similarly, feeding tomatoes too much too soon, can have an adverse affect and reduce the amount of tomatoes we produce rather than increase them. An over fed plant (pre-flowering) will probably produce too many leaves which will reduce flowering and fruiting!
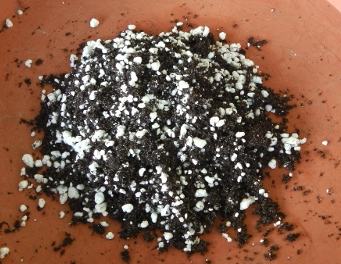
Soil/Compost for Tomatoes
A light fluffy mix comprising of compost with the addition of perlite is ideal. The surface area of the Oasesbox is large compared to the cone’s total capacity, so there is plenty of oxygen available to the roots at the soil surface.
Surface Roots and Tap Roots
The Oasesbox provides a good surface area (when filled to the very top lip) and this enables surface roots to absorb the oxygen a plant needs for optimum growth. Tap roots grow down into the reservoir and provide the plant with water 24/7.
These roots are happy living under water while other roots at the surface need soil that is not saturated with water in order to absorb oxygen from the air. So, a mature plant has both a wet and dry area from which to access what it needs.
Is there enough root space?
When tomato plant roots receive the right combination of water, nutrients and access to oxygen, they require much less space for their roots than a plant grown without a reservoir of water and nutrients on hand. An example of this is a Heartbreaker variety growing in a 3 inch Grodan cube.
Professional growers understand that it isn’t the size of container that matters, it’s having water and nutrients available 24/7 in a well aerated medium – soil, rockwool, coir etc., that produces the best results!
Watering – When and How Much?
So how much water should we give our plants that are growing in an Oasesbox self watering planter – don’t we just fill the reservoir and leave it? No, or we may damage the young plant’s roots!
Settle In – Water Once!
Young tomato plants are usually transferred into SWPs when they are about 8 to 12 inches tall, or after the danger of frost has past. That’s the end of May outside in the UK, or the beginning of May in an unheated greenhouse.
Don’t fill the reservoir
At this point we shouldn’t fill the reservoir at all. Just water them once thoroughly at the soil surface, as you would when planting generally, and leave them for four or five days without further watering. This helps establish a good root system. Newly transplanted tomato plants should have their roots established by only one initial watering.
As soil dries and air is absorbed back between the soil particles, then roots grow in search of water.
• If you water every day after transplanting ….
• Roots won’t grow to their full potential.
• soil may become saturated – without enough oxygen, slowing growth.
Over watering young plants can cause root disease, especially in spring when night temperatures drop. We don’t want a young plant sitting in cold, wet soil 24/7 and especially overnight. Give the plant a few days to settle down and start to grow roots. This happens as the soil dries and plants will grow roots very quickly, to establish and protect themselves against drought – but they won’t grow a good root system if the soil is too wet.
Fill with just two or three litres
After around five days, depending on the temperature etc., the Oasesbox reservoir can be filled with around 2 to 3 litres of water – nutrients aren’t necessary at this stage if we are growing in soil.
Note: Filling the reservoir to the top (15 Ltrs) will only create too much water in the soil, which for a young plant will probably cause root problems. It takes a while for surface roots to develop to the stage where it is safe to fill the Oasesbox to the maximum level.
Adding Perlite To Soil
Tomato plants need access to oxygen in their root system for maximum growth. This is why a good quality compost and the addition of perlite helps. Some growers will add at the rate of 50/50 soil / perlite.
However, even a cupful of perlite added to the soil of each Oasesbox, will help the roots develop to their full potential and stay healthy. 5 or 10 Ltr bags of perlite can be purchased from most garden centers.
Fill to the 10 litre level when the first truss sets
Keep the reservoir filled to around 2 to 5 litres until the first truss begins to set, after which the 10 litre level can be used as a fill level.
Fill to 15 litre level when the second truss sets
When the second and third truss has tomatoes and the fruit are swelling, then the reservoir can be filled to the maximum level.
The cone shape design
However, because of the cone shape, much less of the soil and root area is below the water surface, than if using a standard rectangular pot shape. The cone shape helps avoid over watering and soil saturation.
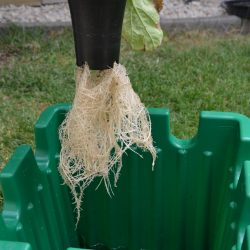
Roots below water
Not all roots are the same (as stated above).
Some like to be at the soil surface absorbing oxygen. Others like to by down below the water surface so that the plant can absorb moisture whenever it needs it. This photo shows how roots like to grow out of the cone and into the reservoir. These are nice healthy, strong white roots!
Feeding Plants In The Oasesbox Self Watering Planter – The issue of calcium
Calcium is required by tomato plants, not least in order to avoid Blossom End Rot. When plants have a shortage of calcium, it is usually because the soil they are in, becomes too dry in hot weather – when a plant needs plenty of water. Dry soil means that roots are unable to absorb nutrients. This problem is largely avoided when using the Oasesbox because of the large reservoir.
How calcium is provided
Calcium can be obtained by plants from the soil, tap water and tomato food. Not all tomato food contains calcium, so it is sometimes necessary to add it as a supplement. This is mainly necessary when growing medium or large tomato varieties. Cherry tomatoes need less calcium and therefore are less likely to be subject to Blossom End Rot.
Two part feeds and calcium
Professional growers use a two part feed and mix calcium together with other nutrients just before they are applied to the reservoir or watering system. This is because when calcium is mixed with other nutrients, it precipitates – drops out of the solution. That’s why a lot of liquid tomato food doesn’t contain calcium!
A good quality compost, with the addition of a little calcium just before fruiting, should be enough to provide all the calcium needed for the larger fruiting varieties. If you live in a hard water area, you probably have enough calcium in your tap water for your plants already!
However, if you use cheap compost and live in a soft water area, you could have a shortage of calcium when the tomatoes are swelling – especially if you are growing larger varieties.
Chempak Calcium
Calcium can be added to the reservoir or applied as a foliar feed. Chempak Calcium is a good make and some gardeners even use skimmed milk when plants start to set fruit!
Low fat milk
Only use low fat milk diluted 50/50 with water. This is sprayed on the underside of the leaves around the trusses as the fruit are swelling every week or two – depending on the size of tomatoes grown. Large toms weekly, medium every ten days, small toms unnecessary. Cherry tomatoes are rarely affected by Blossom End Rot.
Foliar spraying
Foliar spraying directly onto leaves avoids the issue of calcium not mixing with other nutrients (precipitation) and gets the calcium to where it is needed more quickly than through the roots.
So how much feed should be given?
Balanced general food and tomato food
After the nutrients in the soil/compost have been used up, around four or five weeks after planting in the Oasesbox, tomato plants will require feed in their reservoir 24/7 with the water.
Cherry and medium size tomato varieties
Start by adding a liquid balanced food (not tomato food) at a half of the recommended dose on the feed container. Over feeding at an early stage will delay flowering. Once the flowers have set fruit on the first truss, liquid tomato feed can be given at half the recommended strength.
Notice that we are using a balanced feed to begin, then a tomato feed after the tomatoes have set on the first truss. This method works very well for cherry and medium size tomatoes.
Beefsteak Tomatoes
For the larger tomato varieties, it is best to continue with a balanced feed until after the second truss has set. This helps stop tomatoes from ripening before they reach full size – large varieties have a lot of growing to do! Tomato feed, that is high in potassium, tends to bring fruit to the ripening stage too soon, especially if you want several trusses of full size beefsteak tomatoes.
When feeding tomatoes it is better to give small amount regularly, rather than larger amounts infrequently. Little and often is the secret!
If you have any questions, please email me and I will be pleased to answer them. The most successful growers are those who keep an eye on their plants. Watch the leaves – colour and shape.
Plants will show you when there is something wrong! The most successful growers use their experience and the visual appearance of their plants to get the best results. With so many variables involved when growing tomatoes, getting the maximum yield from any growing system takes time – but it is time well spent!